Friday, January 31, 2020

How to write an Incantation in Inventaverse


Inventaverse is pretty big.  It's got a ton of features, mountains of code and lots of artwork.  In the midst of all that creation is one feature that I'm particularly fond of.

The Incantations API

"What's the Incantations API Precious?", you ask?  Close your eyes and imagine three (not one, not two, but three), unimaginably powerful books, that when found in game, grant the player access to a toolkit for building their own custom spells.  That's right, you can write your own spells and further customize your play style in Inventaverse using PLAIN OLD JAVASCRIPT. 


"Why would I ever want to do that?", you calmly ask?  Well, allow me to explain to you, my naive reader, why you would want to wield such an incredibly powerful force in a video game.  (by way of list)

1. Because it gives you an advantage over the game, and other players.
2. By writing incantations the skills available to you are massively increased.
3. The incantations you write complement your favorite skills and your artifacts.
4. Because learning and understanding the three books of magic and the Incantations API, is very interesting.

Each of the three books contains a set of abilities related to one of the three types of magic in Inventaverse.
  • The Compendium of Physical Magics will allow you to spend your collected weapon ranks to add or remove physical matter from the game world.
  • The Grimoire of Eldritch Forces allows you to sacrifice your health to teleport or deal damage to enemies.
  • The Tome of Unifying and Dividing Energies lets you spend your gold to heal wounds, or improve your speed and jump capabilities.
 In addition to these books, a set of fundamental abilities are available to you through the "Common API".  These are abilities that don't require any particular spell book in order to use them.

Spells and Wards

When any of the three spell books are combined with each other and the common API, some very complex and interesting custom spells are able to be created.

For example, the following Ward:


if(API.Affectable(API.Target())) { API.Reveal(API.Target()); }

let row = API.Environment.Physical.length;
let cells = [];

while(row --> 0) {
  let col = API.Environment.Physical[row].length;
  while(col --> 0) {
    if(API.Environment.Physical[row][col] != 0) cells.push(new Point(col, row));
    }
  }
API.Reveal(cells);


This Ward makes use of the Common API, and the methods exposed by The Compendium of Physical Magics, to reveal blocks that are physical to the player, and to highlight the block under the mouse cursor, only if it is within the area of effect of the player's incantations.  Simply put, it shows you what is physical and the areas that your custom spells can affect.  Because it's ward, it will run continuously after the player presses the key it's bound to (either the R, F or V keys).

A ward is an incantation that continues running all the time, a spell is an incantation that runs only once, have a look at this Spell:


API.Self.Sacrifice(5);

let loc = API.Target();

API.Self.Teleport(loc);
API.Finish(0); 


Let's break this one down.  The first line sacrifices 5 health in exchange for enough magic to do something interesting.

Next, we create a variable with the let statement, called loc.  After the = sign, we're getting the result of a function called API.Target(), this gives us the location under the mouse cursor.

After that we run the function API.Self.Teleport(loc).  This function relocates our player to the location in the loc variable.

Take note of the API.Finish(0) command on the last line.  This is the command that instructs the API to only run the incantation one time.  If this line were missing, the incantation would continue to run, sacrificing 5 health every time the game cycle updates.  In addition to that, the 0 in parenthesis is specific to which incantation should be finished.  0, 1, or 2, the index for each of the incantations bound to the player's R, F and V keys.

And there you have it.  Some sample incantations, a little background on potentially the most powerful feature in Inventaverse.  Use it wisely.

Until next time...

Tuesday, January 8, 2019

From Lasers to Lightning - By Josh Hollis

Prerequisite knowledge - Fundamental understanding of Canvas, some HTML5 and Javascript familiarity.
Disclaimer - Do not expect this code to magically work in your application.  The code in this post is meant to explain the concepts behind how beams and bolts are rendered in Inventaverse, not as a copy paste resource.


1.21 Gigawatts!

There comes a time in one's life when it becomes necessary to obliterate the enemy with more than just beams.  If we want to ensure that every atom of matter has been thoroughly and properly destroyed, we want to use 1.21 Gigawatts of power to do it!

In this article I'll go over the concepts behind creating a simple laser beam in Javascript.  Then I'll show you how we can spice up our laser beam by segmenting it and turning it into an awesome lightning bolt!


Lasers... an elegant weapon for a more civilized age

That's right, lasers!  Or, in our case, a couple of lines that alternate colors rapidly so as to give the impression of being a laser.  Here's how we do it:

With the grace of the great drawing artist Escher, we'll begin with a single line.

Our renderLaser function takes starting point, slope and distance.  We'll describe our line using it's slope as a parameter instead of supplying the start x,y and end x,y because we're going to do something with that later.

 1
 2
 3
 4
 5
 6
 7
 8
 9
10
11
12
function renderLaser(start, slope, distance) {
  // first, we'll calculate the endpoint.
  let end = {
    X : start.X * slope * distance,
    Y : start.Y * slope * distance
  }

  context.beginPath();
  context.moveTo(start.X, start.Y);
  context.lineTo(end.X, end.Y);
  context.stroke();
}

Nothing to it, if you've wired up your canvas correctly, and you've correctly called this function then you should have a nice solid line that looks something like this line from Inventaverse:


Now, add one megajoule of pulsating laser power.  We'll alter our renderLaser function slightly by alternating it's color every frame between two colors supplied as a parameter, by using the modulus operator % (secretly the most useful operator for sprite animation, in the universe).


 1
 2
 3
 4
 5
 6
 7
 8
 9
10
11
12
13
function renderLaser(start, slope, distance, colors) {
  // first, we'll calculate the endpoint.
  let end = {
    X : start.X * slope * distance,
    Y : start.Y * slope * distance
  }

  context.beginPath();
  context.strokeStyle = window.frameCounter % 2 === 0 ? colors[0] : colors[1];
  context.moveTo(start.X, start.Y);
  context.lineTo(end.X, end.Y);
  context.stroke();
}

You may have noticed an additional variable hanging off the window object here (which is generally a bad practice, but for the sake of this exercise, it's fine), frameCounter.  This is just a count of the total number of frame drawn since the script was loaded.  Simply increment this every time requestAnimationFrame calls your drawing function and your laser will alternate between two supplied colors quite nicely.

Let's animate one more property of our line, the width.  


 1
 2
 3
 4
 5
 6
 7
 8
 9
10
11
12
13
14
function renderLaser(start, slope, distance, colors, widths) {
  // first, we'll calculate the endpoint.
  let end = {
    X : start.X * slope * distance,
    Y : start.Y * slope * distance
  }

  context.beginPath();
  context.strokeStyle = window.frameCounter % 2 === 0 ? colors[0] : colors[1];
  context.lineWidth = window.frameCounter %2 === 0 ? widths[0] : widths[1];
  context.moveTo(start.X, start.Y);
  context.lineTo(end.X, end.Y);
  context.stroke();
}

Now that we're all on the same page...

At this point, you're right about where I was at when I decided I wanted some of the weapons in Inventaverse to do more than just fire a beam.  I wanted a little more sizzle, and some variety.  

So, how do we turn lasers into lightning bolts?

Well, there's more than one way to discharge a massive bolt of electricity, and the way that made the most sense to me was this:

  • break our beam up into lots of little line segments.
  • at each of the points where the line segments touch, jitter the x and y coordinates such that the line is no longer straight.
  • season to taste.

 1
 2
 3
 4
 5
 6
 7
 8
 9
10
11
12
13
14
15
16
17
18
19
20
21
22
23
24
25
26
27
function renderLightning(start, slope, distance, colors, widths) {
  const nodes = 500;
  const cracle = 16;
  let bn = [];
  let scalar = 0;

  // pick a bunch of points on our line and jitter them up!
  for(let n = 0; n < nodes; n++) {
    scalar += (Math.random() * ((distance-scalar)/nodes));
    let r = {
      X : (Math.random() * crackle) - crackle/2, // jitter the x a little
      Y : (Math.random() * crackle) - crackle/2  // jitter the y a little
    };
    bn.push({ X : slope * scalar + r.X, Y : slope * scalar + r.Y });
  }

  context.beginPath();
  context.strokeStyle = window.frameCounter % 2 === 0 ? colors[0] : colors[1];
  context.lineWidth = window.frameCounter %2 === 0 ? widths[0] : widths[1];
  context.moveTo(start.X, start.Y);

  bn.forEach((v, i) => {
    context.lineTo(v.X, v.Y);
  });

  context.stroke();
}

Here's what it ends up looking like!  Not too shabby eh?


Lightning Speed

Alright, we have lightning, but it's... slow lightning...  Let's see what we can do to speed this up.

Obviously the slowest part is the iteration.  Javascript is perfectly capable of executing 500 iterations in far less than a millisecond, so expecting it to do it in under 16.67 ms is perfectly reasonable.  However, there is certainly room for improvement.  Generating a random number is slow. 

Back in the day, when we wanted to avoid doing expensive computations at run time, we would generate a pool of results ahead of time, and then perform a quick lookup.  This is faster than generating individual random numbers inline by a degree of magnitude. 

Also, a basic for loop executes about 10 times faster than a forEach.  Sorry hipsters!  Save your fancy ES6 array functions for one-time situations, not real time graphics scenarios.

Make these minor modifications to your lightning bolt and you'll shave the render time down to practically nothing!

One final note: you could make your renderLaser function a little easier to call into by wrapping all it's parameters into one laser configuration json object, and adding a default parameter object.  Sometimes when you end up with 4+ parameters, things start looking a little crazy.

Using the techniques I've covered in this article, we can create some pretty amazing lightning effects, see for yourself:


At this point, the only question remaining is: How do you create a creature that is so awesome that it would necessitate using our badass new lightning bolt to destroy it?  

But that my friends, is a story for anther day.

Until next time...

Tuesday, October 16, 2018

Generating Procedural Worlds in Inventaverse (Part 1) - By Josh Hollis


It's a problem every programmer is faced with, early in their career.  You know... "Removing elements as you traverse an array changes the total number of array elements thus opening a gateway to the nether-world."  Although this is closely related to the problem that is the focus of this article, this is not the problem today.  Allow me to set the stage.

So there I was, writing algorithms for the purpose of generating procedural worlds in my indie game project, Inventaverse (a retro styled 2d massive multiplayer maker game that runs on the web).  The randomly generated worlds in question, need to have a good mix of open space, floating islands and tunnels.  Why?  Because Inventaverse features 14 playable characters, each with a unique play style.  Some have grappling hooks, some fly, some can dig through the ground, so building a random world generator that will consistently pose a challenge is not a trivial problem.  

Not impossible, but not trivial.

I know what you're thinking: "Why not use cellular automaton to generate random topographies".  I was thinking the same thing.  I pulled up some code I had written centuries ago that does just that.


Here's how it works.
1. Populate a matrix(2D array) with random values between 0 and 1.
2. Snap those values to 0 or 1 by checking if they're less than, or greater than a supplied parameter, we'll call it Q.
3. Evaluate the neighboring values of each index in the matrix, how many of them are 1's?
4. If the number of neighbors with a value of 1 is greater than some supplied parameter(C) then we set the value of the array at the index in question to 1.  Otherwise, we set it to 0.

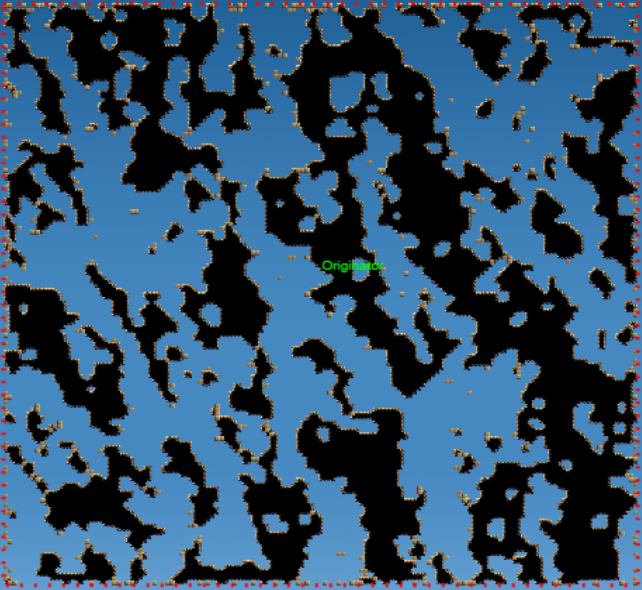
The results were great.  They were random, lots of space, floating islands, tunnels, awesome!  However, there was a very noticeable artifact.  The topographies generated by this method were all somewhat... slanted.  After some brief investigation it occurred to me that the mere act of traversing the array top to bottom, left to right, was causing the anomaly.

See the upper-left to lower-right tendency?


When using a cellular automaton in this way, you're evaluating the neighbors around the current index, then subsequently changing the current value to 1 a portion of the time.  The slanting I was seeing was a side affect of altering the values in the matrix in a specific order.  And sometimes, it looked really cool!  I considered the slanting effect a moment and decided to keep it around, for variety!  

But clearly we couldn't have a slanted world every time, so I set out to traverse the matrix in such a way that the map generated wouldn't be skewed in any particular direction.  My options were as follows:

1. Consider the source matrix as immutable, write the results of my transformations to a new matrix and return that.
2. Traverse the matrix non-linearly by scanning the matrix in a back and forth fashion.

 
I opted for the latter.

So, now instead of processing the 2D array from top to bottom, left to right, I processed it left to right, then right to left, then left to right etc.


Uniformly distributed randomness, perfecto!

Doing this solved the problem straight away.  So I pulled the "slanted" world generation logic into a separate function which I called "Linear", and put the scanning style world generation logic into another method called "Scan".  Then I came up with the idea of processing the matrix by using spiral traversal, and the results were awesome.  

But that, my friends, is a story for another day.

Until next time...